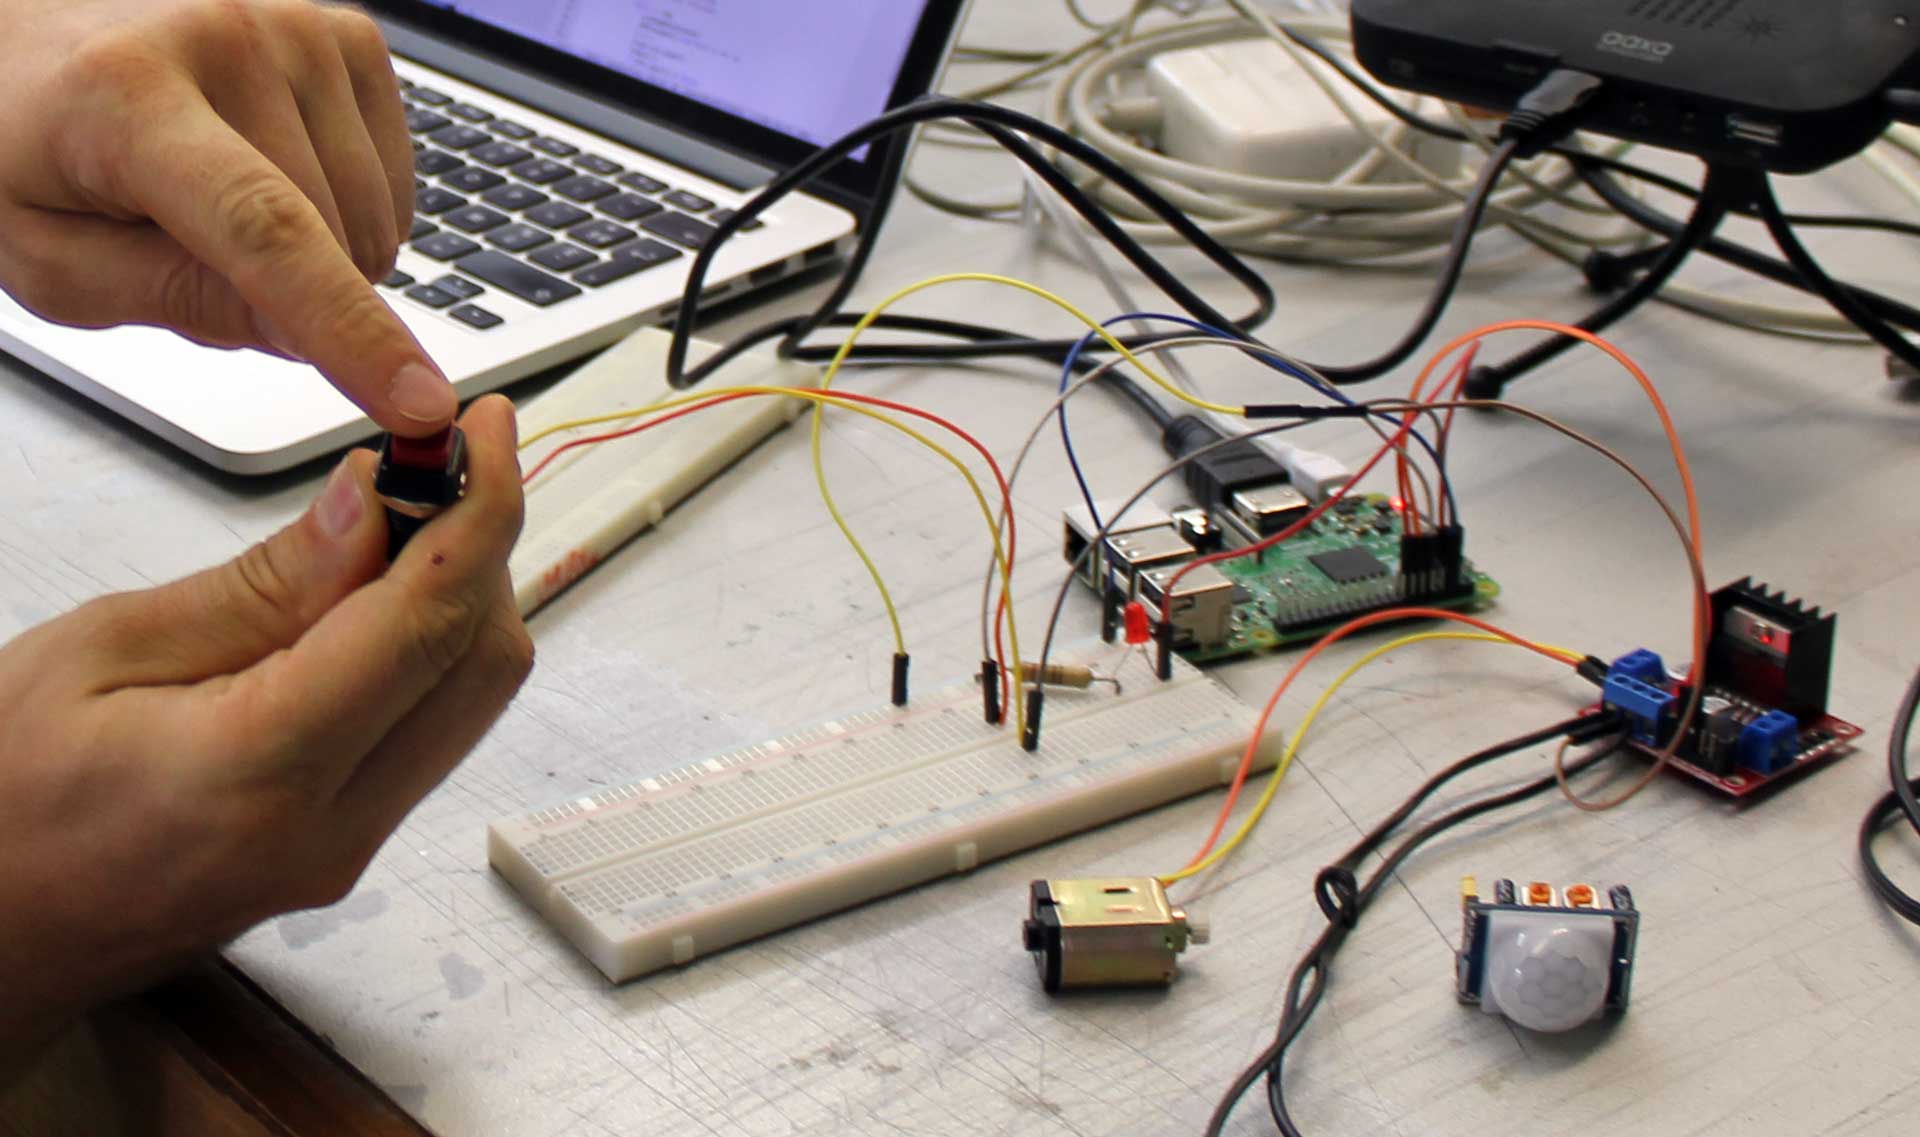
Physical computing - Summer Digital Workshops 2017
Here under, you will find some code and links worked during the workshop : http://imal.org/en/summerworkshops2017/pi#letsgetphysical
Code 01
Code pour lire un poteniomètre et faire varier la fréquence d'un haut-parleur
///////////////////////////////////
int potentiometre = 0;
int nouvellefrequence = 0;
void setup() {
}
void loop() {
potentiometre = analogRead(A0);
nouvellefrequence = map(potentiometre,0,1023,100,15000); /// l'analogique donne une valeur entre 0 et 1023, je veux faire varier la frequence de 100 à 15000Hz
tone(8,nouvellefrequence);
delay(10);
}
///////////////////////////////
Code 02
Code pour jouer une mélodie en faisant varier le tempo
Code Flavio :
unsigned int note[3] = {4186, 4698, 6271};
int pinHP = 4;
int dur=0;
void setup() {
Serial.begin(9600);
pinMode(pinHP, OUTPUT);
}
void loop() {
int dur = analogRead(A0);
Serial.println(dur);
for(int i; i<3; i++) {
tone(pinHP, note[i]);
delay(dur);
}
}
///////////////////////////////
/* mélodie disco, la longueur des notes (decay) varie avec l'aide du potentiomètre*/
int potentiometre = 0;
int frequence;
int decay = 50;
int vit= 300;
void setup() {
pinMode (02, OUTPUT);
gate = int (random (50,1000));
}
void loop() {
// read the input on analog pin 0:
int sensorValue = analogRead(A1);
//frequence = map (sensorValue, 0,1023, 100, 14500);
// print out the value you read:
decay = map (sensorValue, 0,1023, 50,vit);
Serial.println(sensorValue);
tone (02,110,decay);
delay (vit);
tone (02,220, decay);
delay (vit);
tone (02,110, decay);
delay (vit);
tone (02,220, decay);
delay (vit);
tone (02,110, decay);
delay (vit);
tone (02,220, decay);
delay (vit);
tone (02,116,decay);
delay (vit);
tone (02,233, decay);
delay (vit);
}
/////////////
code minimal Luc
int potentiometre = 0;
void setup() {
}
void loop() {
potentiometre = analogRead(A0);
tone(8,660);
delay(3 * potentiometre);
tone(8,510);
delay(3 * potentiometre);
tone(8,200);
delay(3 * potentiometre + 100);
}
/////////////
code minimal Luc - plus interactif
int potentiometre = 0;
void setup() {
}
void loop() {
potentiometre = analogRead(A0);
tone(8,660);
delay(3 * potentiometre);
potentiometre = analogRead(A0);
tone(8,510);
delay(3 * potentiometre);
potentiometre = analogRead(A0);
tone(8,200);
delay(3 * potentiometre + 100);
}
Fonctions
Premier exemple avec void
int potentiometre = 0;
void setup() {
pinMode(13, OUTPUT);
}
void loop() {
musique();
clignote();
musique();
}
void musique(){
potentiometre = analogRead(A0);
tone(8,660);
delay(3 * potentiometre);
potentiometre = analogRead(A0);
tone(8,510);
delay(3 * potentiometre);
potentiometre = analogRead(A0);
tone(8,200);
delay(3 * potentiometre + 100);
}
void clignote(){
digitalWrite(13,HIGH);
delay(1000);
digitalWrite(13,LOW);
delay(1000);
}
//////////////
Exemple avec plusieurs fonctions avec des retours
int potentiometre = 0;
int resultatducalcul;
void setup() {
pinMode(13, OUTPUT);
}
void loop() {
musique();
clignote();
musique();
resultatducalcul = aucarre(2);
clignotevitesse(200,13);
delay(1000);
clignotevitesse(1000,13);
}
void musique(){
potentiometre = analogRead(A0);
tone(8,660);
delay(3 * potentiometre);
potentiometre = analogRead(A0);
tone(8,510);
delay(3 * potentiometre);
potentiometre = analogRead(A0);
tone(8,200);
delay(3 * potentiometre + 100);
}
void clignote(){
digitalWrite(13,HIGH);
delay(1000);
digitalWrite(13,LOW);
delay(1000);
}
int aucarre(int monchiffre){
int resultat = monchiffre * monchiffre;
return resultat;
}
void clignotevitesse(int rapide, int pin){
digitalWrite(pin,HIGH);
delay(rapide);
digitalWrite(pin,LOW);
delay(rapide);
}
//////////////////////////////////////////////
// led PWM avec potentiometre
int pinLED = 5;
int pinPOT = A0;
void setup() {
pinMode(pinLED, OUTPUT);
}
void loop() {
int howmuch = analogRead(pinPOT);
howmuch = map(howmuch, 0, 1023, 0, 255);
analogWrite(pinLED, howmuch);
delay(10);
}
Puissance
Schémat d'un pont H
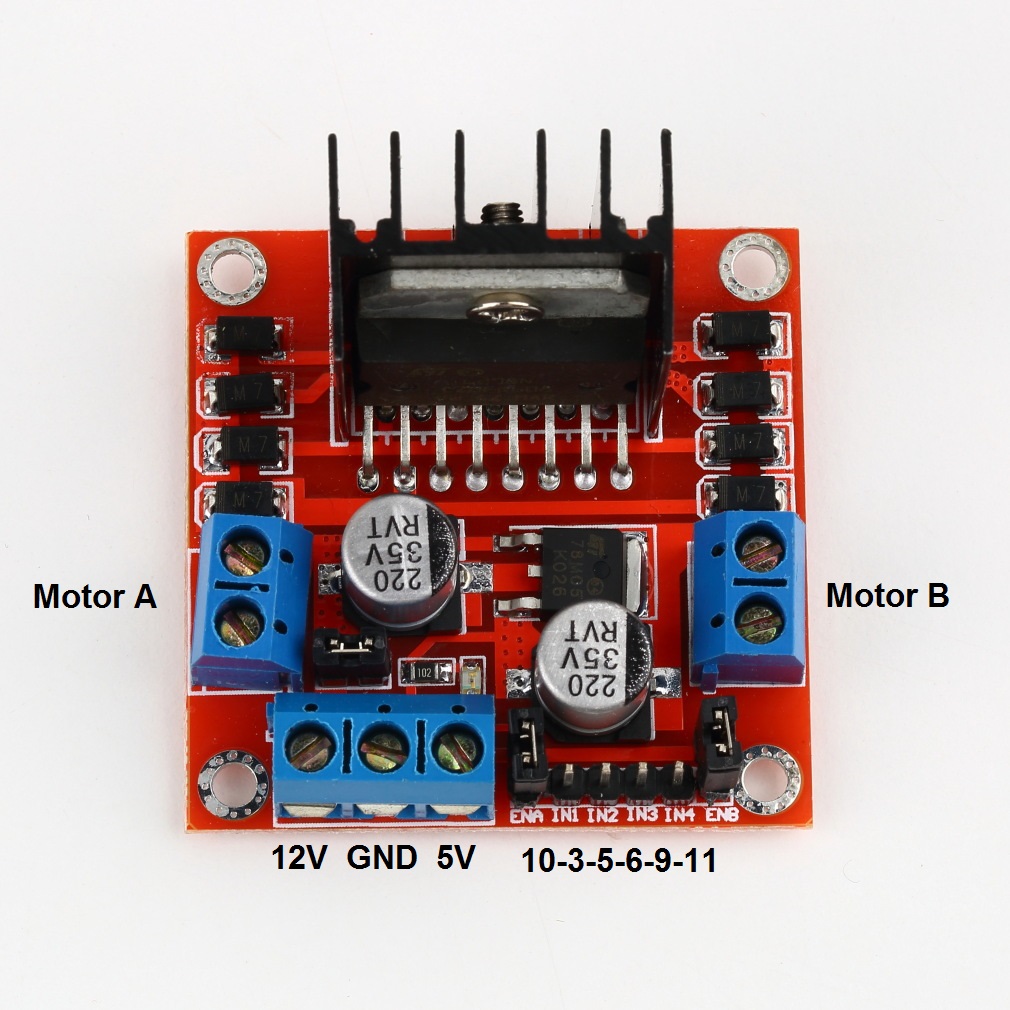
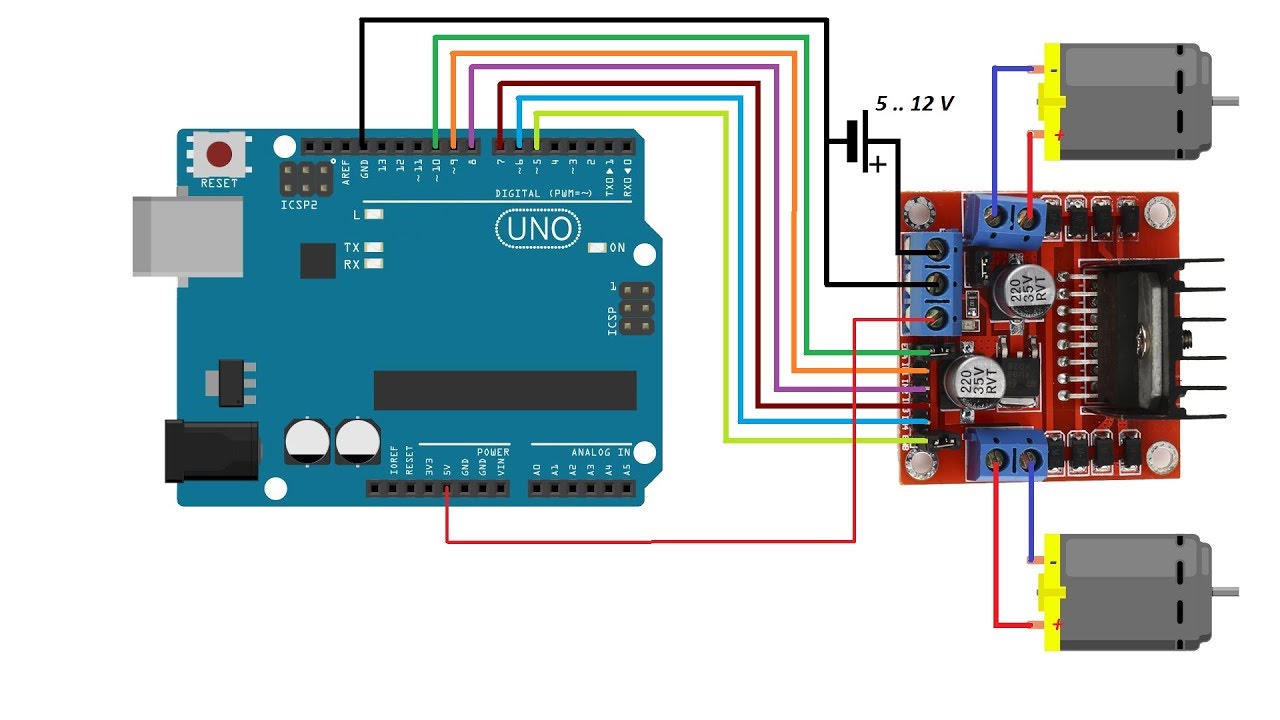
Par exemple un double pont H
L298N
Moteurs
Moteurs DC ou courant continu
Animation 1 :
Animation 2 :
Moteur AC ou courant alternatif
Pas vu
Servo-moteur
"moteur asservi"
Moteur pas à pas / step motor
// servo + pot
#include <Servo.h>
Servo s;
void setup() {
s.attach(6);
}
void loop() {
int deg = analogRead(A0);
deg = map(deg, 0, 1023, 0, 180);
s.write(deg);
delay(10);
}
/// code simplifié minimal pour servo-moteur
#include <Servo.h>
Servo myservo;
void setup()
{
myservo.attach(9);
}
void loop() {
myservo.write(90);
delay(2000);
myservo.write(0);
delay(2000);
}
Kit de capteurs
Kit Keyes 37 capteurs :
Exercices
respiration 001
#include <Servo.h>
Servo myservo;
int lecturepotentiometre;
void setup() {
myservo.attach(9);
}
void loop() {
lecturepotentiometre = analogRead(A0); // chiffre entre 0 et 1023
respiration(lecturepotentiometre * 10);
}
void respiration(int temps){
myservo.write(0);
delay(temps);
myservo.write(90);
delay(temps);
}
Capteurs
PIR - détecteur de mouvements
explications : https://learn.adafruit.com/pir-passive-infrared-proximity-motion-sensor/how-pirs-work
ESP8266
installation
Ajouter au board manager : http://arduino.esp8266.com/stable/package_esp8266com_index.json
ajouter library "pubsubclient"
ajouter library "AdafruitMQTTlibrary"
Serveur
gratuit : https://www.cloudmqtt.com/
Logiciel client windows : MQTTfx
Client android : MQTT Dashboard
autre client android : Linear MQTT Dashboard
/////// exemple de reception pour allumer une LED ou un relais
/***************************************************
interupteur
non crypté
pas de SSL !
****************************************************/
#include <ESP8266WiFi.h>
#include "Adafruit_MQTT.h"
#include "Adafruit_MQTT_Client.h"
/************************* WiFi Access Point *********************************/
#define WLAN_SSID "imal_summer"
#define WLAN_PASS "themagicwordis!"
/************************* Adafruit.io Setup *********************************/
#define AIO_SERVER "m21.cloudmqtt.com"
#define AIO_SERVERPORT 10707
#define AIO_USERNAME "mkhblqbj"
#define AIO_KEY "BdZ8yMyMGUER"
/************ Global State (you don't need to change this!) ******************/
// Create an ESP8266 WiFiClient class to connect to the MQTT server.
WiFiClient client;
// Setup the MQTT client class by passing in the WiFi client and MQTT server and login details.
Adafruit_MQTT_Client mqtt(&client, AIO_SERVER, AIO_SERVERPORT, AIO_USERNAME, AIO_USERNAME, AIO_KEY);
/****************************** Feeds ***************************************/
// Setup a feed called 'time' for subscribing to current time
Adafruit_MQTT_Subscribe message001 = Adafruit_MQTT_Subscribe(&mqtt, "messages001");
//Adafruit_MQTT_Subscribe slider = Adafruit_MQTT_Subscribe(&mqtt, AIO_USERNAME "/feeds/slider", MQTT_QOS_1);
/*************************** Sketch Code ************************************/
const int relayPin = D1;
void message001callback(uint32_t current) {
if(current == 1){
digitalWrite(relayPin, HIGH);
Serial.println("HIGH");
}
if(current == 0){
digitalWrite(relayPin, LOW);
Serial.println("LOW");
}
Serial.println(current);
}
void setup() {
Serial.begin(115200);
delay(10);
Serial.println(F("Adafruit MQTT demo"));
// Connect to WiFi access point.
Serial.println(); Serial.println();
Serial.print("Connecting to ");
Serial.println(WLAN_SSID);
WiFi.begin(WLAN_SSID, WLAN_PASS);
while (WiFi.status() != WL_CONNECTED) {
delay(500);
Serial.print(".");
}
Serial.println();
Serial.println("WiFi connected");
Serial.println("IP address: "); Serial.println(WiFi.localIP());
message001.setCallback(message001callback);
mqtt.subscribe(&message001);
pinMode(relayPin, OUTPUT);
}
uint32_t x=0;
void loop() {
// Ensure the connection to the MQTT server is alive (this will make the first
// connection and automatically reconnect when disconnected). See the MQTT_connect
// function definition further below.
MQTT_connect();
// this is our 'wait for incoming subscription packets and callback em' busy subloop
// try to spend your time here:
mqtt.processPackets(10000);
// ping the server to keep the mqtt connection alive
// NOT required if you are publishing once every KEEPALIVE seconds
if(! mqtt.ping()) {
mqtt.disconnect();
}
}
// Function to connect and reconnect as necessary to the MQTT server.
// Should be called in the loop function and it will take care if connecting.
void MQTT_connect() {
int8_t ret;
// Stop if already connected.
if (mqtt.connected()) {
return;
}
Serial.print("Connecting to MQTT... ");
uint8_t retries = 3;
while ((ret = mqtt.connect()) != 0) { // connect will return 0 for connected
Serial.println(mqtt.connectErrorString(ret));
Serial.println("Retrying MQTT connection in 10 seconds...");
mqtt.disconnect();
delay(10000); // wait 10 seconds
retries--;
if (retries == 0) {
// basically die and wait for WDT to reset me
while (1);
}
}
Serial.println("MQTT Connected!");
}
////////////////