Fox - variations
Hello!
I'm here today, and all the days to come, to share my experience at the iMal FabLab.
First, it was awesome discovering a place where all those tools were at disposition. There's a Laser cutting machine, 3D printers, lots of tools to get everything corrected and... A milling machine! This one was certainly the hardest to get used to, really hard to learn how to use it. The program is a bit more complicated than the other machines.
On the first day, we got to learn how to use all of them. One of the most fascinating was certainly the laser cutting machine. I mean, I've never seen one even, it was totally awesome! And so, it's the one I worked to most with.
Check out the gallery at the end of the post for pictures of the FabLab! (:
After learning everything we needed to know to not destroy everything, we got started on our differents projects.
I've decided to go on with a project I was already working on before: Low poly models. I chose a fox I modelised as a "experiment subject". The goal here was to try out differents techniques available to get a 3D result. It would be a great way to make a summary of all the things we can do in the FabLab.
I also really like that fox. It wasn't so hard to modelise, yet it's great having such a cool form to work with. And I wouldn't have been able to actually use the papercraft method that you'll see further in this post if it wasn't a low poly model.
*Hover the photos to have more details about the process!*


So first, I decided to work with what was familiar to me:
The 3D printer.
We have one at school aswell, which made it more handy to work with, and the process was very simple, yet slow.
The printer proceed by adding layers of PLA plastic over and over, when the platform goes slowly down. After around 2h36 (Yes, that accurate!), the model was finally ready! Sadly, the quality isn't optimal, the fact that we had to share printers left me no choice but to set the quality at normal instead of optimal, so I would gain time and let the others use the machines too.
There's another plastic used called ABS, but this one is a bit harder to work with, the machine is often clogged, so I decided to stick with the PLA one.
The difference doesn't sound so big, but it is. It's basically just about how much the platform will go down at each layer. Optimal il about 0.1mm, when normal is around 0.25mm, which makes it more than half the resolution already.
Here's how it's presenting itself, while using the program Cura, made for the Ultimakers printers:

The interface is really intuitive and easy to use, there's many options available to work with!
Let me enlighten you:

Here's what we have.
Quality: Precision at which the result will come out. It's important to pick the right one; If it's a test, low quality will do and save time. A high quality can take up to few hours more!
Shell: It's the thickness of the wall's model.
Infill: It will determine the solidity of the model. A higher infill density will make it, of course, stronger.
Material: We know it's PLA, better don't touch this or it could mess up the printing!
Speed: Talks by itself.
Cooling: Without it, the result may be horrific.
Support: Every model actually need supports. It's not mandatory, but so far with all the tests we made in class, no support often result on having a model with really bad quality zones.
Build Plate Adhesion: The printer will make a first layer raft to make sure the first layer of the model will be perfectly printed.
Those are the most important settings.
Let's have a closer look of the Fox before the printing.


And now, the printing process!


We can see already the supports building up to handle the overextending head of the fox that will be printed last.
And here some final pictures on differents angles:


The result was really satisfying despite the quality being set on normal.
Let's go for the next prototype!
Laser Cutting: Stacked Fox.
This method is totally awesome. The laser cutting maching is so far, my favorite. It's really easy to use, very intuitive aswell, and the results/possibilities are just CRAZY!
It's simple: Import the file in .DXF into the program, and start the cutting part. The machine is also really impressive, it's massive. I'd say approximatively 1,50m x 1m. Something like that. To be honest, it's kinda intimidating.
I sadly don't have many pictures of the process here because the protective glass of the machine made everything slightly blurry, and the pictures aren't so clear and nice. But I'll show the process a bit.
First, here's the interface. It's the program 123Maker by Autodesk:

Let's give a look at the settings:

Not much differents settings, the program cut the 3D models itself, the slice direction can be changed but it's not so interesting as I realised the straight cutting offered a more stable result.
At this point... I've made the first mistake during my project.
As you can see, the fox up there is about 96mm high. The wood panels were 3mm thick. I'll admit it, I'm surely not a math genius, but there I was really being a huge idiot. Let's see another example picture:

I first had this result. It seemed satisfying, I liked how it looks. YET CAREFUL! Never go too fast in a project... The whole thing was in inches instead of milimeters. Which crashed the it and made the final Stacked fox about 2,54 times FLATTER than it should. The program counted 0.3 inches thickness instead of 0.3cm. Look at this abomination!


I wish I would have been more careful!
But now, let's have a closer look on how it should looks like when it's a REAL SUCCESS! ANd so here are the plans, containing 34 pieces. (34 pieces x 0.3cm = +-10cm, I DID THE MATH NOW!)
The program being set in mm, I started cutting!

And the model how it should be:


And here's the result after cutting: Advanced puzzle for adult:

Yes it's a bit complicated at first, but once I ordered the numbers, it got easier.

I used a metal thread to align the pieces perfectly, and so, it was time to glue everything!
Here's the final result! Isn't he beautiful?


And finally, the two of them reunited for the best effect!

My adventure continue with the same program, but this time...
The Interlocked Fox.
At this point, I'm already more familiar with the program, and I swear I wouldn't do the same mistake!
Here's the interface again:

As you can see, the pieces are just conecting with each others by interlocking.
The setting:

This time the process is different but the settings are practically the same as for the Stacked Fox. I chose an option with the esthetic that pleased me the most. 1st Axis and 2nd Axis are just the amount of slices on Y and Z.
So the preview showed this one, I liked the design much so I went for it.


The plan is presented as following:

So let's go for the cutting part! I was afraid it would start burning, you know, flames everywhere and everybody panicking! But no, the wood is solid enough and mixed with glue.
Here's after the cutting:

The precision of this machine is just incredible...
I decided then to attack the building part of it:


And so the final was... Looking handsome!


No glue was even needed! This is ROCK SOLID! I was really surprised of the robustness, that's just beyond madness.
And so I had to go for the last one.
The papercraft Fox.
This one is so far my favorite of them all!
I'm very much into origamis, and papercraft is really the next level when you talk about paper creations.
Let's take a look on the interface, same program again (So many possibilities with it, that's so awesome!):

As you can see, the program cuts the part in a smart way. They all fit together really well to form back the model. And as I said earlier in this post, if I had chosen a model that wasn't low polygon, the program would have done hundreds of really small folds. Which makes the building really complicated and time consuming.
The challenge with this method was that... Well you know, the laser is kinda hot. Paper doesn't welcome heat so well. It's easy to burn it, easy to just turn into ashes. I had to set up the laser heat manually.
For the cutting:
Power 8.
Speed 40.
For the engraving (Basically I needed to know where to fold without the paper being completely cut.):
Power 5.
Speed 60.
The paper is 90gr/m², It's really thin, almost as think as basic printing paper. But I took the challenge!
Here are the settings:

I decided to make it as big as the Interlocked Fox. It's way easier for assembly at the end, I don't have such small hands.
Here's a preview before the cutting:

And how the plans looked like!

AND AGAIN! MISTAKES! DAMMIT AURORE! I should have think twice. There's a possibility to choose the joint type.

At first I thought diamonds would be nice, fitting very well, it seemed simple. But after the cutting, I started to assemble the whole thing and... It just didn't work at ALL.
Too small, too impossible to glue, too horrible!

As you can see, it's pretty impossible. So I decided to recut with the tongue joint type. You'll see, it's way better!

The little tongues just fit in holes made for it. A point of glue and it's done! It still took approximatively 7h to assemble completely. But the joint method was finally perfect.
Here some more pictures of the building process:


And finally, it was READY!


I didn't go further than the 4 above, since we didn't have much time. But the miling machine looked like it could have been really interesting. I'm sad that I couldn't get to use it aswell.
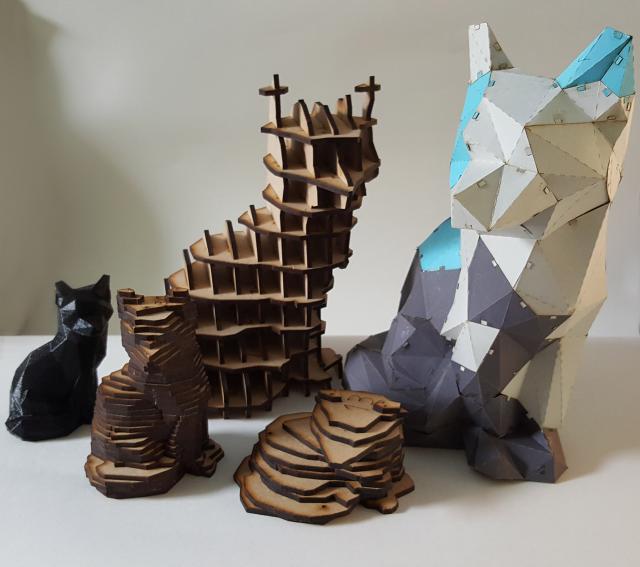
And a little family photo for the road!

As a conclusion I'll say that I got to learn how to use machines that look complicated, to be more careful about how to prepare the models for those machines. It's not as easy as it looks like, when you're not so familiar with it, mistakes are easily made. But I'm glad I had to chance to even land a hand on it.
I'll leave some photos down there in the gallery of the others too, this workshop was awesome!
I hope you found happiness in my share of this experience.
Sincerly,
Aurore.
Gallery


Info
Date: November 2016
Last updated: March 2018