Good CNC design practice
Here below are some data taken from : https://www.3dhubs.com/knowledge-base/reducing-cnc-machining-costs-13-de...
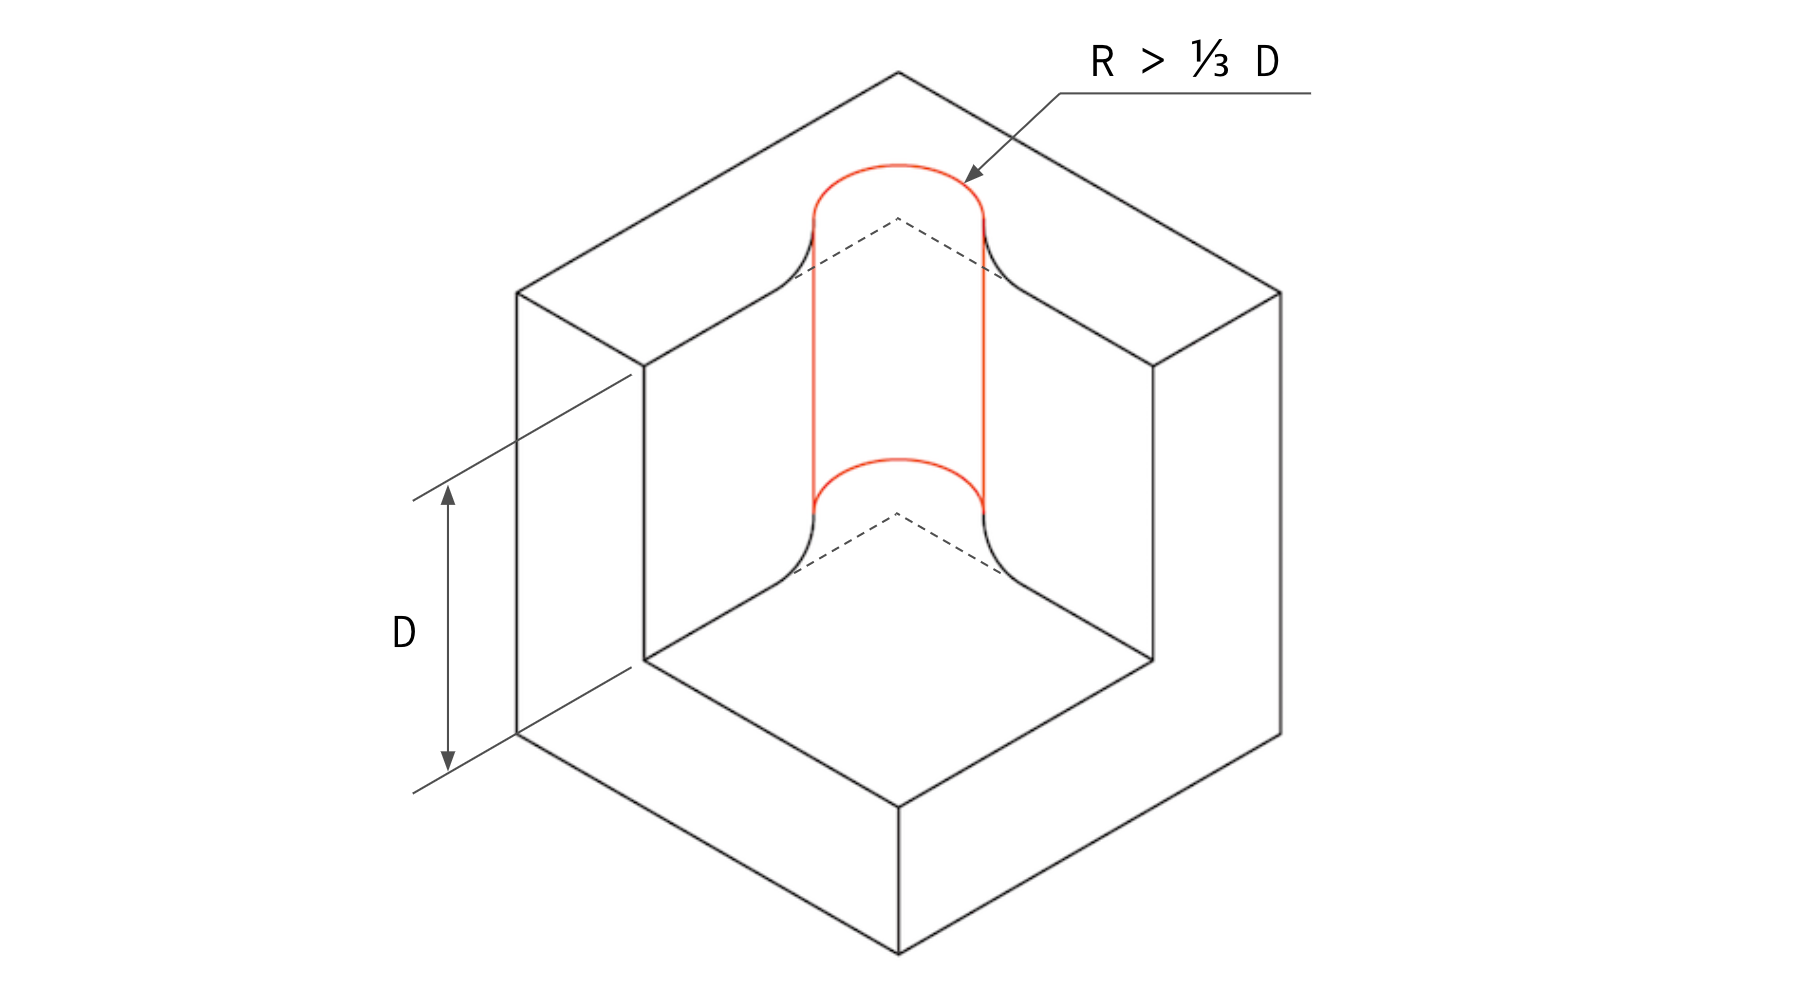
Tip #1 - Add a Radius in Internal Vertical Edges

Add internal radii at the corners of at least 1/3 of the depth of the cavity
All CNC milling tools have a cylindrical shape and will create a radius when cutting the edge of a pocket.
Corner radius can be reduced by using a tool with a smaller diameter. This means though that multiple passes at lower speed will be required - smaller tools cannot remove material in one pass as fast as larger tools - increasing the machining time and cost.
To minimize cost:
- Add a radius of at least 1/3 of the depth of the cavity (the larger the better).
- Preferably, use the same radius in all internal edges.
- On the floor of the cavity, specify a small radius (.5 or 1 mm) or no radius at all.
Pro Tip #1: Ideally, the corner radius should be slightly larger than the radius of the tool that will be used to machine the cavity. This reduces the loads on the tool and will further reduce your manufacturing costs. For example, if your design has 12 mm deep cavity, add a 5 mm (or larger) radius at the corners. This will allow a ø8 mm tool (that is a 4 mm radius) to cut them at a faster speed.
Pro Tip #2: If internal edges with sharp corners are required (for example, when a part with rectangular shape needs to fit in the cavity), instead of reducing the radius of the internal edges, use a shape with undercuts like this:

When a part with rectangular shape needs to fit in a cavity, add undercuts at the corners of the cavity
Tip #2 - Limit the Depth of Cavities

Limit the depth of cavities to 4 times their length
Machining deep cavities affects the cost of CNC parts dramatically, as a lot of material needs to be removed, which is very time-consuming.
It is important to keep in mind that CNC tools have a limited cutting length: typically they will work best when cutting cavities with a depth of up to 2-3 times their diameter. For example, a ø12 milling tool can cut cavities safely up to 25 mm deep.
Cutting deeper cavities is possible (up to 4x the diameter of the tool or greater), but this will increase the cost, as special tooling or multi-axis CNC systems are required.
Also, when cutting a cutting a cavity, the tool has to ramp into the correct cutting depth. Smooth entrance requires sufficient space.
To minimize cost:
- Limit the depth of all cavities to 4 times their length (i.e. largest dimension on the XY plane).
Tip #3 - Increase the Thickness of Thin Walls

Increase the thickness of thin walls to reduce the machining time
Unless weight is a major factor, thick solid sections are more stable (and less costly to machine) and should be preferred.
To avoid deformation or fracture when machining a thin wall, multiple passes at low cutting depths are required. Thin features are also very prone to vibrations, so machining them accurately is challenging and increases the machining time considerably.
To minimize cost:
- For metal parts, design walls thicker than 0.8 mm (the thicker the better).
- For plastic parts, keep the minimum wall thickness above 1.5 mm.
Remember: The minimum achievable wall thickness for metals is 0.5 mm and for plastics 1.0 mm. The machinability of these features must be accessed on a case by case basis though.
Pro Tip: Thin walls are commonly encountered when placing hole (and threads) very close to the edge of the part. Make sure that you follow the above guidelines also when you position holes in your design.
Tip #4 - Limit the Length of Threads

Limit the maximum length of threads to 3 times the hole diameter
Specifying threads that are longer than necessary can increase the cost of CNC parts, as special tooling may be required.
Keep in mind that threads longer than 1.5 times the diameter of the hole do not actually add to the strength of the connection.
To minimize cost:
- Design threads with a maximum length of up to 3 times the hole diameter.
- For threads in blind holes, it is preferable to add at least 1/2 diameter of unthreaded length at the bottom of the hole.
Tip #5 - Design Holes with Standard Size

Use standard drill sizes when designing holes
Holes can be CNC machined fast and to a great accuracy using standard drill bits. For non-standard sizes, the hole must be machined using an end mill tool, potentially increasing the cost.
Also, limit the depth of all holes to 4 times their diameter. Deeper holes (up to 10 times the diameter) can be manufactured, but they will likely increase the cost, as they are problematic to machine.
To minimize cost:
- Design holes with with diameter that is an increment of 0.1 mm for diameters up to 10 mm and 0.5 mm above that.
- Design holes with legth of up to 4 times their diameter.
Tip #6 - Specify Tolerances only when Necessary

Specify tolerances only when necessary
Defining tight tolerances raises the cost of CNC, as it both increases the machining time and requires manual inspection. Tolerances should be defined sparingly and only when necessary.
If a specific tolerance is not defined on the technical drawing, then the parts will be machined using the standard tolerance (± 0.125 mm or better), which is sufficient for most non-critical features.
Tight tolerances are especially difficult to achieve on internal features. For example, while machining intersecting holes or cavities, small defects may develop at the edges (called the burr), due to the deformation of the material. Parts with such features require inspection and deburring, which are both manual (and time inefficient) processes, increasing the cost.
To minimize cost:
- Specify tighter tolerances only when necessary.
- Define a single datum (for example the cross section of two edges) as reference for all dimensions with tolerances.
Pro Tip: Using Geometric Dimensioning and Tolerancing (GD&T) in your technical drawings (such as flatness, straightness, circularity and true position) can reduce the cost of CNC machining, as they often define a looser tolerance, but require advanced design knowledge to apply effectively.
Tip #7 - Keep the number of Machine Setups to a Minimum

Example of a part that requires two machine setups: the part is rotated to machine the side features
It is recommended to design parts that can be machined in as few machine setups as possible and preferably in only one setup. For example, a part that has blind holes on both sides will be machined in two setups, as it needs to be rotated to get access to both sides.
Rotating or repositioning the part adds to the manufacturing cost, as it usually needs to be done manually. Moreover, for intricate geometries a custom fixture might be required, further increasing the cost. Especially complicated geometries may require a multi-axis CNC system, further increasing the price.
Consider splitting the part into geometries that can be CNC machined in a single setup and that can be bolted or welded together later. This is also applicable for parts with very deep pockets.
To minimize cost:
- Design parts that can be machined in only one setup.
- If this is not possible, separate the geometry into multiple parts that can be assembled later.
Tip #8 - Avoid Small Features with High Aspect Ratio

Consider adding bracing support to small features with aspect ratio greater than 4
Small features with high width-to-height aspect ratio are prone to vibrations, and thus particularly difficult to machine accurately.
To improve their stiffness, they should either be connected to thicker walls or reinforced with bracing support ribs (preferably four: one on each side).
To minimize cost:
- Design features with a width-to-height aspect ratio less than 4.
- Add bracing support or connect the small features to a wall to improve their stiffness.
Tip #9 - Remove all Text & Lettering

Adding text on the surface of CNC parts increases the price
Adding text on the surface of a CNC machined part can increase the cost significantly, as additional and time-consuming machining steps are required.
Surface finishing methods, such as silk screening or painting, are a more cost-effective way of adding text on the surface of a CNC machined part.
To minimize cost:
- Remove all text and lettering from your CNC machined parts.
- If text is necessary, prefer engraved over embossed lettering, as they latter requires the removal of a lot more material.
- Also, prefer using a Sans-Serif font (like Arial or Verdana) with a size of at least 20-points.
Tip #10 - Consider the Machinability of the Material
Machinability refers to the ease with which a material can be cut. The higher the machinability the faster a material can be CNC machined, lowering the cost.
The machinability of each material depends on its physical properties. Typically, the softer (and more ductile) a metal alloy, the easier it is to machine.
Brass C360 is the metal with the highest machinability, allowing for high-speed machining. Aluminum alloys (like Al 6061 and Al 7075) can also be machined very easily.
Stainless Steel has 10 times lower machinability than aluminum and will take at least 2 times more to machine. Note that different steel grades have different machinability. For example, Stainless Steel 304 (the most common Stainless Steel alloy) has a machinability index of 45%, while Stainless Steel 303 (an alloy with very similar chemical composition) has an index of 78%, making it easier to machine.
The machinability of plastics mainly depends on their stiffness and thermal properties. During CNC machining, plastics are prone to melting and warping.
POM (Delrin) is the easiest plastic to machine, while ABS comes in close second. PEEK and Nylon are other common engineering plastics that are a bit more difficult to machine.
To minimize cost:
- If you have the possibility to choose between materials, prefer the one with better machinability (especially for large volume orders).
Tip #11 - Consider the Cost of the Bulk Material
The cost of the bulk material is another factor that can greatly affect the price of the CNC machined parts.
The table below summarizes the price of metal alloys and plastic materials commonly used in CNC for a sheet with dimensions of 6'' x 6'' x 1'' (or approximately 150 x 150 x 25 mm).
| Material | Bulk cost |
|---|---|
| Aluminum 6061 | $ 25 |
| Aluminum 7075 | $ 80 |
| Stainless Steel 304 | $ 90 |
| Stainless Steel 303 | $ 150 |
| Brass C360 | $ 148 |
| ABS | $ 17 |
| Nylon 6 | $ 30 |
| POM (Delrin) | $ 27 |
| PEEK | $ 300 |
Source: McMaster
Aluminum 6061 is clearly the most cost-effective way of creating metal prototypes as it combines low cost and very good machinability.
Notice that the metals that offer greater machinability, like Stainless Steel 303 and Brass C360, have a higher cost and, for this reason, are better suited for larger volume production, as the larger material cost will be overshadowed by the much shorter machining times, taking advantage of economies of scale.
When it comes to plastics, ABS, Nylon, and Acetal (Delrin) are priced approximately the same as Aluminum 6061. They are more difficult to machine though, so expect the price to be higher. PEEK is a very expensive material and should be used only when necessary.
To minimize cost:
- Choose a material with low bulk cost (especially for low-volume orders).
Tip #12 - Avoid (Multiple) Surface Finishes
Surface finishes improve the appearance and resistance to harsh environments of CNC machined parts, but also increase their cost.
Requesting multiple different surfaces finishes on the same part increases the price even further, as extra steps are required (for example, to mask the surfaces).
An article that summarizes the benefits of each surface finish for CNC parts can be found here.
To minimize cost:
- Choose the as-machined surface finish.
- Request multiple surface finishes, only when absolutely necessary.
Tip #13 - Think Blank Size

The size of the blank must be approximately 3 mm (.125'') larger than the part
The size of the blank (stock material) may affect the overall cost: to ensure good accuracy, some material must be removed from all edges of the part.
As a rule of thumb, the blank must be a minimum of 3 mm (.125’’) larger than the end part. Let's see how the size of the blank affects pricing in CNC with an example:
If you design a part that has an envelope of 30 x 30 x 30 mm, then the next larger blank will be used, which in this case will typically be cut from a 35 mm thick sheet. If the part had an envelope of 27 x 27 x 27 mm, then a 30 mm thick sheet could be used saving a lot of material.
To minimize cost:
- Design parts that have dimension 3 mm smaller than a standard blank size.
Gallery
Info
Difficulty: ●●●○○
Last updated: March 2018